OneDrive storage is a cloud-based storage system, which means you’ll usually need to connect to the internet to access your files. This can be a problem for students/teachers who do not have an internet connection or who are going somewhere where there is no internet connection. This guide will show you how to make specific folders available offline, allowing you to access them even when you are not connected to the internet.
How to File or Folder in OneDrive Available Offline
Before we begin this guide, make sure you have updated the OneDrive app to the newest one. If you haven’t installed it yet, here are the steps to install OneDrive on iPhone or iPad.
- Download and install Microsoft OneDrive from the App Store
- Launch the OneDrive app.
- Sign in by entering your username and password.
- Finish the log in process by following the prompts.
Now, after you get all it set, let’s start.
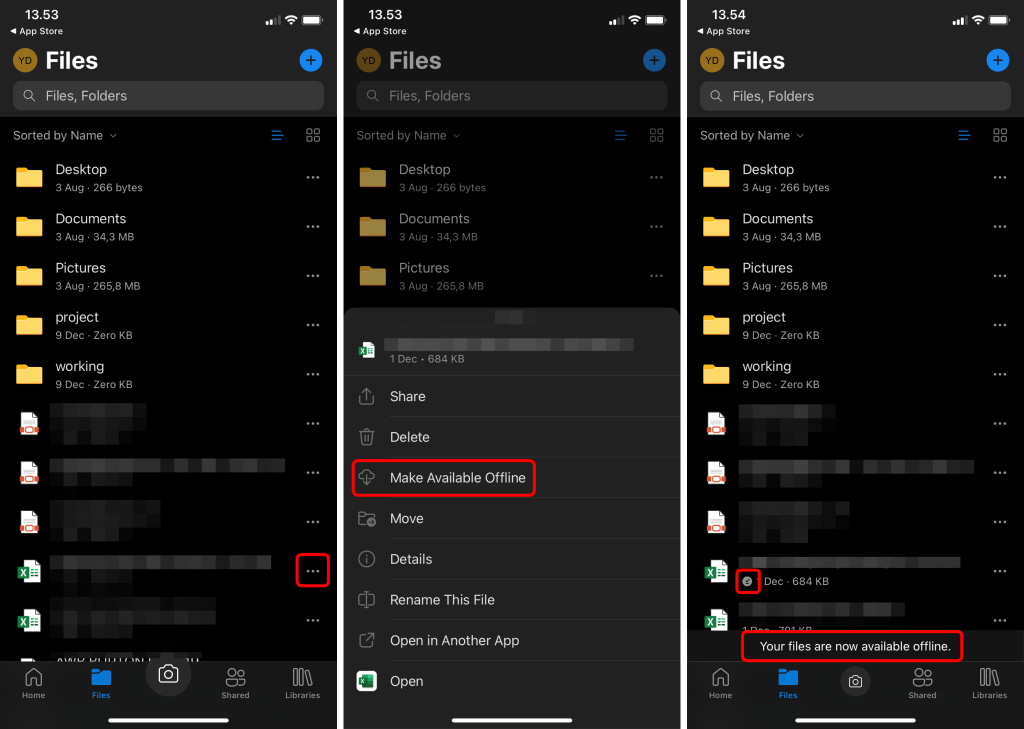
- Launch OneDrive app on your iPhone or iPad.
- Navigate to the file or folder you want to make available offline.
- Choose the three dots on the far right of the folder.
- Choose “Make Offline Available.”
- OneDrive will start downloading all of the content in the folder, making it available without an internet connection.

You may have noticed that new icons appear next to the folders. Below is an explanation of what each file means.
![]() — Files marked with this icon are “Always kept on the device.” That is, they are downloaded locally and do not necessitate the use of an internet connection.
— Files marked with this icon are “Always kept on the device.” That is, they are downloaded locally and do not necessitate the use of an internet connection.
![]() — Files denoted by this icon are actively syncing from the internet to be made available offline. Once the sync is complete, the file will be marked with the icon shown above, indicating that it is now available offline.
— Files denoted by this icon are actively syncing from the internet to be made available offline. Once the sync is complete, the file will be marked with the icon shown above, indicating that it is now available offline.
![]() — Files denoted by this icon are those stored in the cloud. These files WILL NOT be available offline
— Files denoted by this icon are those stored in the cloud. These files WILL NOT be available offline
That’s it. If you want to find any topic related to OneDrive you can check it here. Don’t forget to share this article with your friends if you find this useful. Have a nice day.


