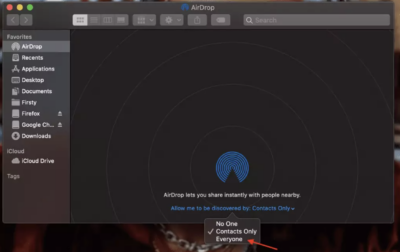
If you are an Apple products user, that loves to share any files between devices quickly because you are a busy person, I suggest you to use AirDrop. So, what is AirDrop? It is a proprietary ad hoc service that is only found in iOS and MacOS operating systems. This service can only be used in iOS 7, iPadOS 13, MacOS X Lion and latter. By using AirDrop you can share files from your iPhone to your MacBook super fast if you compare its performance to Bluetooth only and any other similar services that are already exist recently.
But, do you know how to use AirDrop? If you don’t know yet. It’s time for me to let you know about How to Share Your Files From iPhone to MacBook with AirDrop.
Quick-Step
Turn on your MacBook’s Bluetooth > Click Go > Choose AirDrop > Set to Allow me to discovered by: Everyone > Open iPhone’s Settings > Turn on iPhone’s Bluetooth > Back to Settings > Choose General > tap AirDrop > Set it to Everyone > Choose file(s) to share > Tap share button > Select AirDrop > Tap your detected MacBook’s AirDrop > On MacBook, accept iPhone to share the file.
Sharing Files using AirDrop from iPhone to MacBook
1. Find Bluetooth on your MacBook and turn it on.
2. On the toolbar, click the Go menu, choose AirDrop.
3. Change the setting to Allow me to discovered by: Everyone.

4. Now, find menu Settings on your iPhone, then open it.
5. Find Bluetooth menu and turn it on.
6. After that, back to Settings, then choose General.
7. Tap AirDrop menu. Set it to Everyone.

8. On your iPhone, choose the files you want to share. You can share any videos, documents, photos, apps in any format files.
9. When the files are already chosen, tap share button, select AirDrop. After your iPhone detects your MacBook, tap it.

10. On your MacBook, accept the iPhone to send file.
11. Once the sharing or sending process has finished, you can open or work with the files you received from the iPhone on your MacBook.
That’s all the tutorial of How to Share Your Files From iPhone to MacBook with AirDrop. Hope it’s useful for you and if you have any question related to MacOS and iOS, kindly leave it on the comments. Thanks a lot and see you on the next article. :)))


