Google Chrome is one of the most sophisticated browsers available today. It is backed by a tech giant, used by billions of people, and offers a variety of features that make it an excellent choice for those who are looking for a powerful and versatile browser.
While it may not be the absolute best browser out there, it is certainly one of the most popular, and for good reason. In this article, I’ll share some tips on how to optimize your Google Chrome experience.
Table of Contents
- Use Dark Mode on macOS
- Block Images from Sites
- Pop-up Blocker
- Delete Cookies and Cache
- Change YouTube Video Quality Permanently
- Create a Shortcut to a Specific Web Page
- Picture-in-Picture Youtube Video
- Hide Your WhatsApp Online Status
- Scan Your Saved Passwords and Replace Compromised Password on Android
- Disable and Remove Browser Extension
- Recover Deleted History
- Block or Enable Cookies Permission Only for a Website
- Delete Cookies From Individual Sites
Use Dark Mode on macOS
The purpose of the dark mode from the health side is to reduce exposure of the blue light to our eyes and also help to reduce the eyestrain while you are watching our monitor.
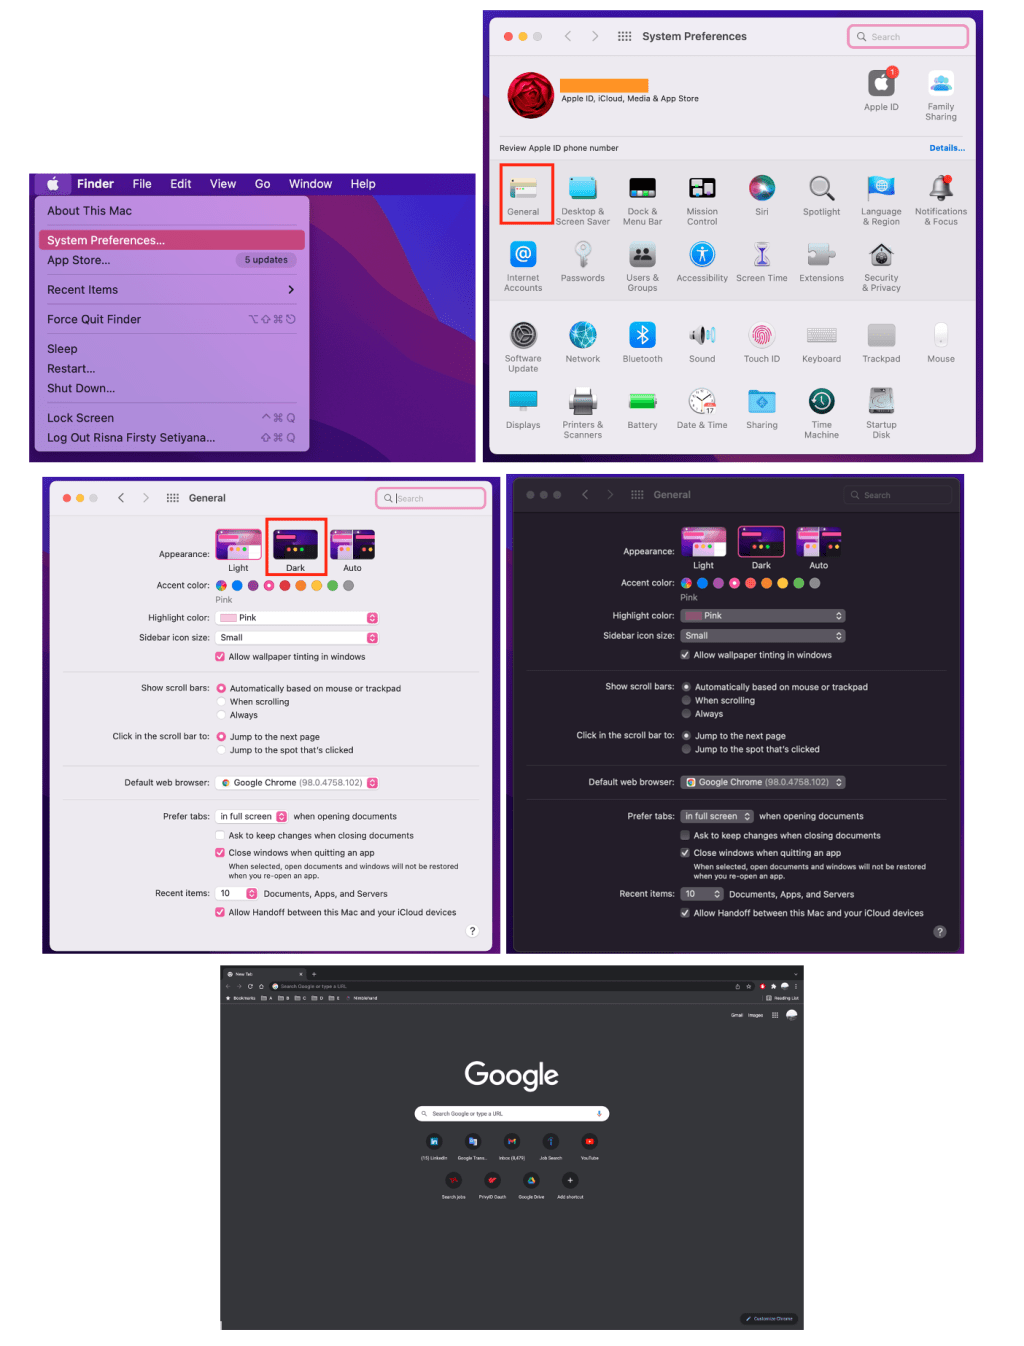
1. First, open the System Preferences on your Mac or MacBook by clicking the Apple icon button on top-left corner of your Mac or MacBook screen and click the System Preferences.
2. Then, choose the General by clicking it once.
3. After that, choose the Dark mode.
4. When the dark mode is activated successfully the theme becomes black or dark color.
5. Now, launch the Google Chrome browser. You will see that it becomes dark too.
Block Images from Sites
If you’re looking for a way to cut down on the amount of data that you’re using when browsing the web, or if you just want to make things a little bit simpler and faster, then blocking images in Google Chrome is definitely the way to go.
1. Launch the Chrome browser on your computer.
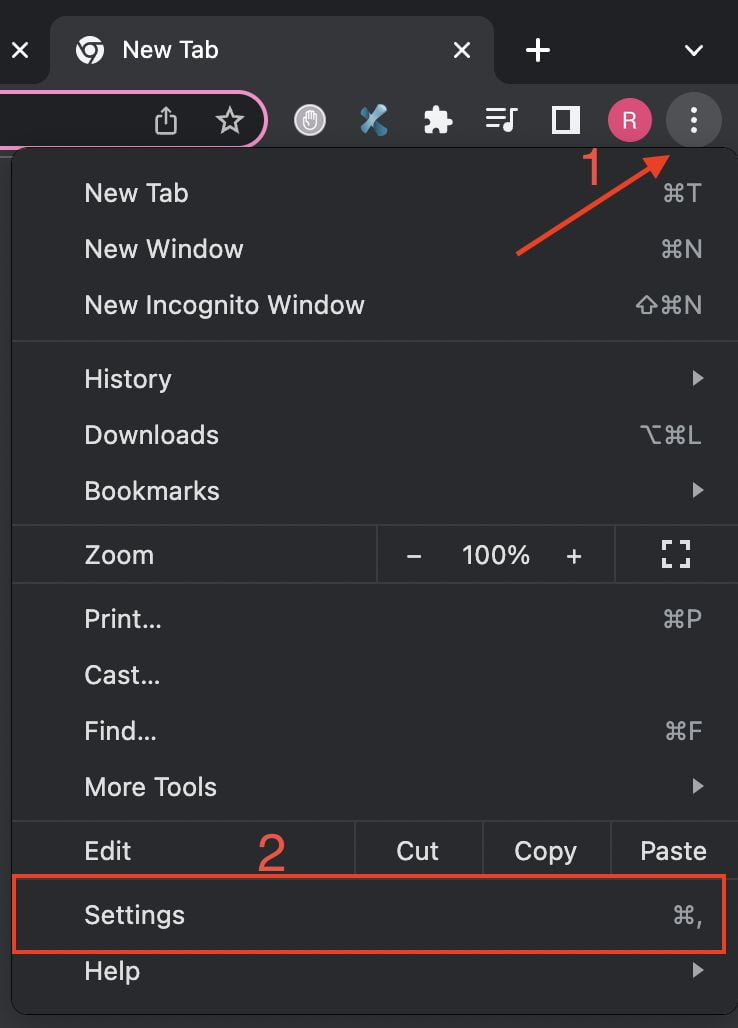
2. Then, click the three-dot button on the top-right corner of the screen. (view screenshots below for the next steps)
3. After that, click Settings.
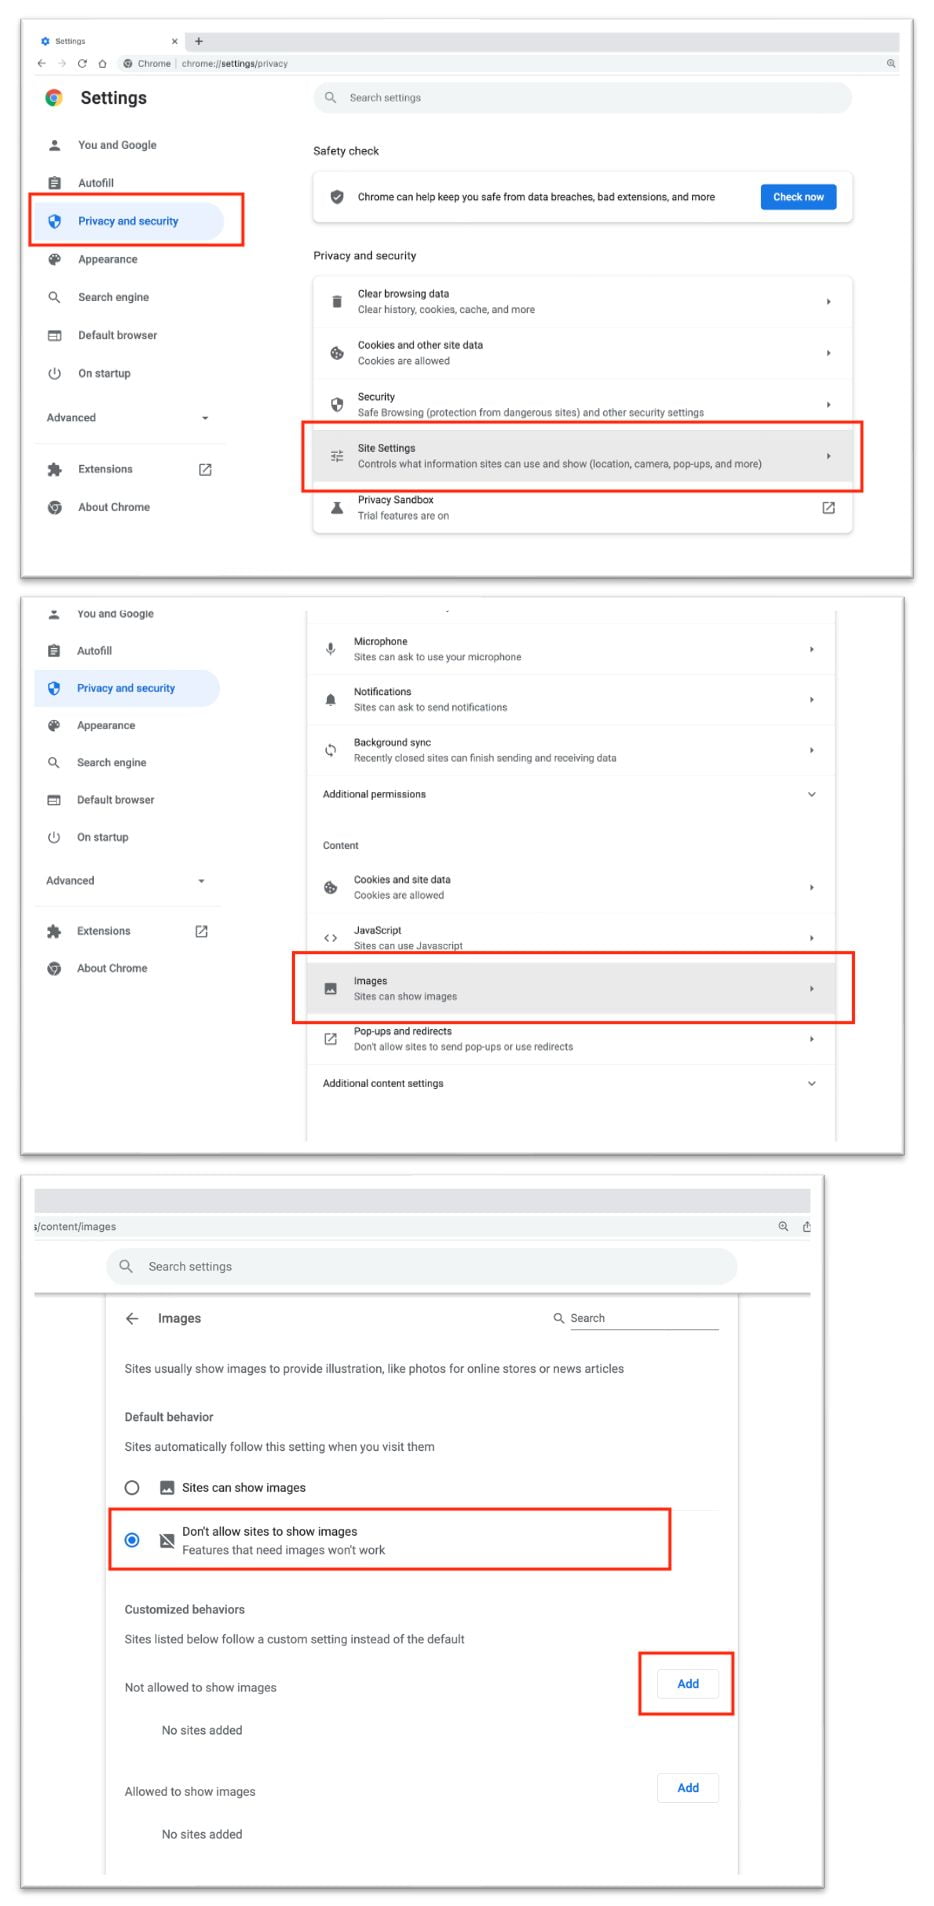
4. Next, click the Privacy and security option on the left pane.
5. Next, click the Site Settings on the right pane.
6. Scroll down the screen to the Content section and click Images.
7. On the Default behaviors section, tick the Don’t allow sites to show images option.
8. To block certain sites, you can click the Add button on the Customized behavior section.
Pop-up Blocker
There are a lot of websites on the internet that embed ads excessively. Because of that, the user’s convenience when they access the website is decreased. To prevent that from happening, you need to use the pop-up blocker.
1. Launch the Chrome browser on your computer.
2. Click the three-dot button on the top-right corner of the browser screen.
3. Then, click Settings.
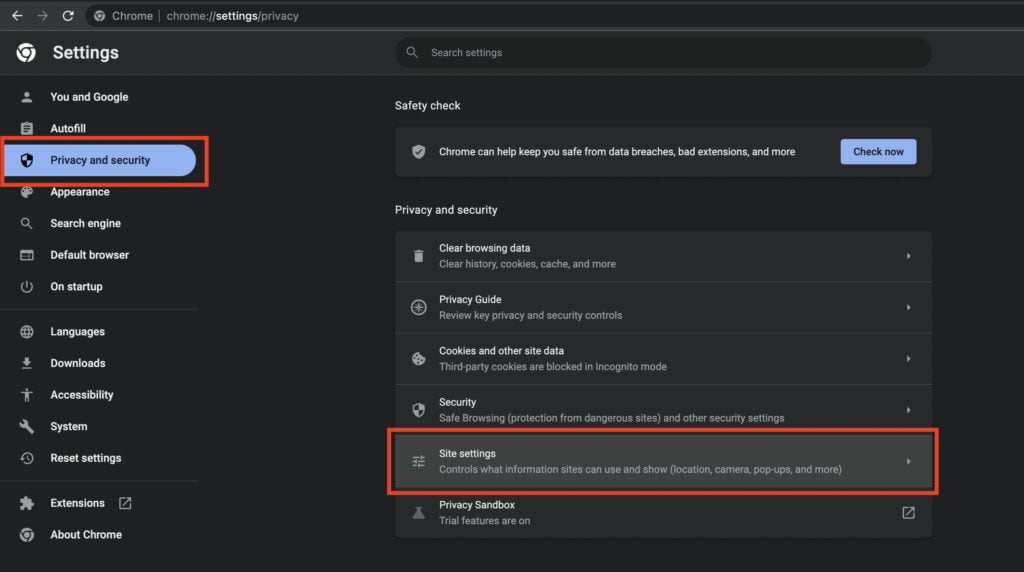
4. After that, click the Privacy and security, and select Site settings.
5. Next, tap the Pop-ups and redirects.
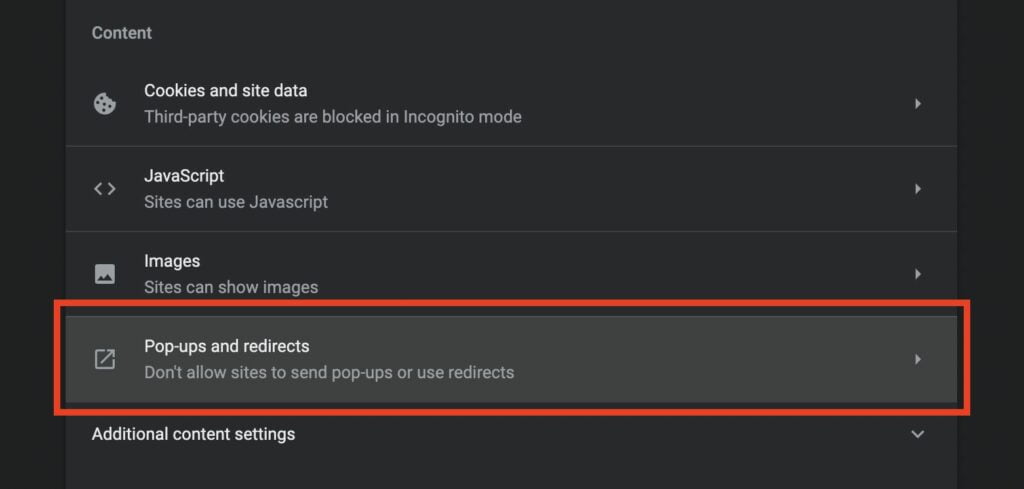
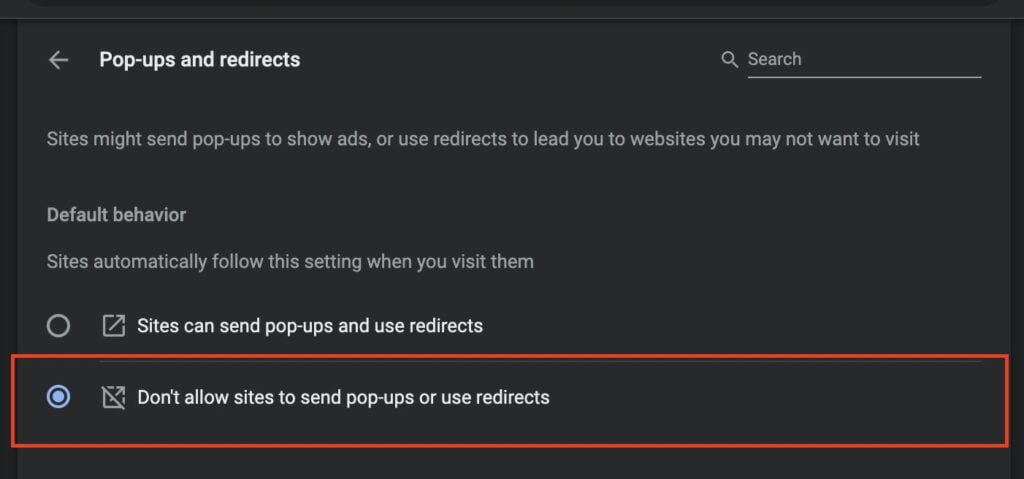
6. Now, tick the Don’t allow sites to send pop-ups or use redirects.
Delete Cookies and Cache
Cookies keep a user’s browsing data (with their permission), and cache helps webpages load faster by remembering images, videos, and other parts of the webpage from the previous visit rather than re-render everything with each visit.
All of this information is deleted when you clear your cache and cookies. That means any passwords you’ve previously entered on a website will need to be re-entered, and the load time of previously visited sites will increase because the content of the webpage will need to be loaded again.
1. Select the three dots in Chrome’s upper-right corner, then Settings from the drop-down menu.
2. Select Clear browsing data under Privacy and security.
3. Select a time range.
4. Choose which data to delete, then click Clear data.

Change YouTube Video Quality Permanently
In fact, you are not always connected to a stable internet connection. Because of that, to keep the video playing without a buffer YouTube will automatically change the video quality of the video you play. However, to keep the video playing at a certain quality you need to use Auto Quality for the YouTube extension.
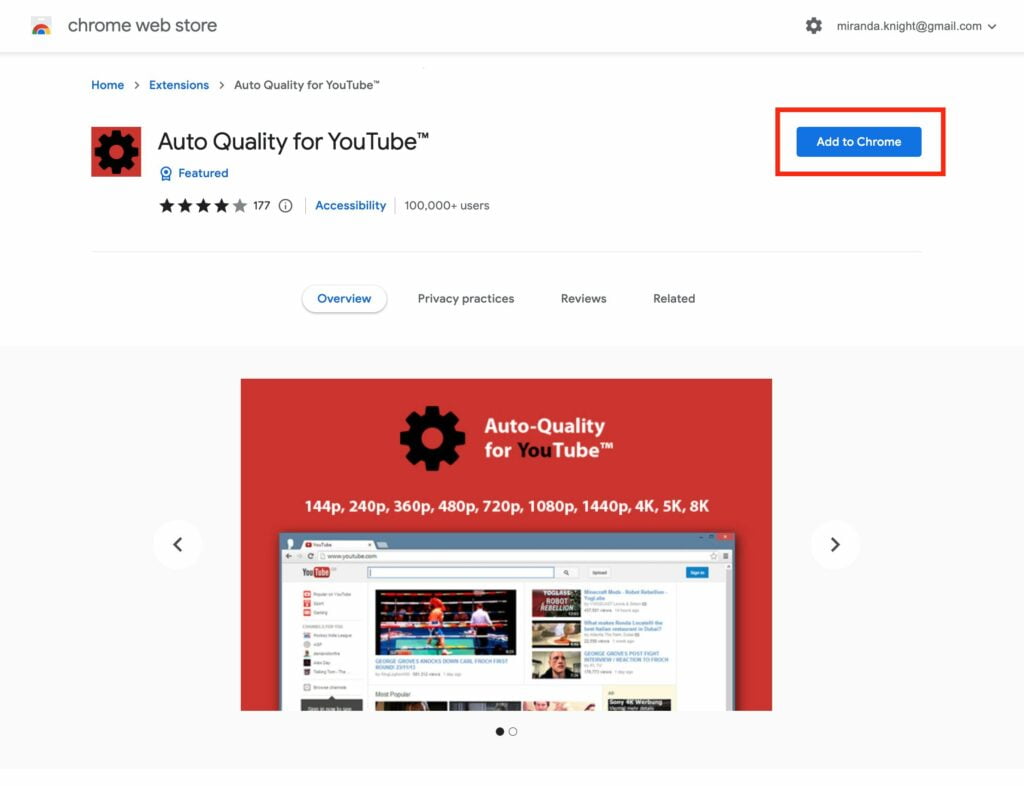
1. First, open Auto Quality for YouTube on your computer’s browser.
2. Then, click the Add to Chrome button.
3. After the extension is added to your browser, head to YouTube.
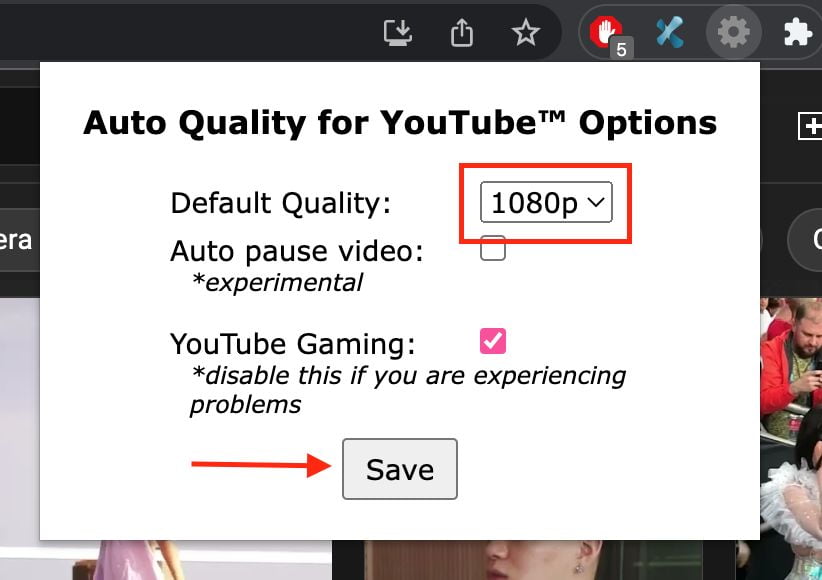
4. Next, open the Auto Quality for YouTube extension.
5. Change the Default Quality that you prefer.
6. Now, click the Save button.
Create a Shortcut to a Specific Web Page
If you’re anything like me, you’re always looking for ways to make your favorite web apps more accessible. And what could be more convenient than a web page shortcut?
1. When the site loads, click the three dots in the top-right corner of Chrome and select More Tools > Create Shortcut.

2. In the “Create Shortcut?” box that appears, click the text field and give your shortcut a name. Then select “Create”.

3. Your desktop website shortcut has now been created, and you can view it by pressing Windows+D. Keep in mind that double-clicking this shortcut will only open your site in Chrome and not in any other web browser.

Picture-in-Picture Youtube Video
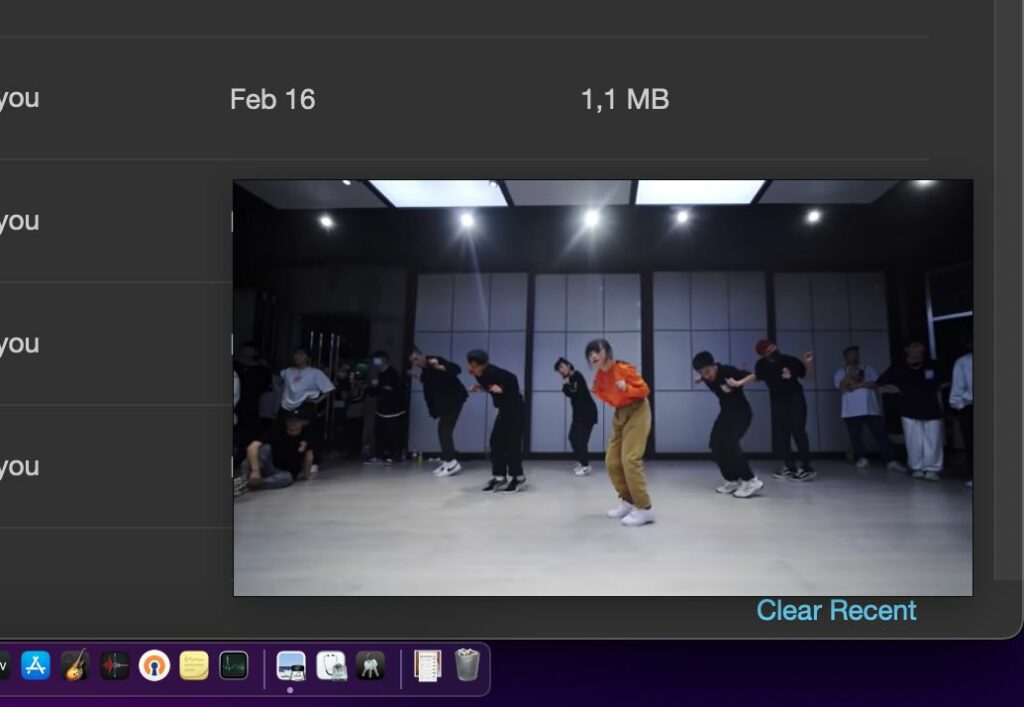
You can’t watch the currently playing video on YouTube via a web browser while you are opening another app, but you can listen to the sound of the video. In order to make the video available on a narrower screen on top of the other apps, you need picture-in-picture Chrome extension.
1. First, open the Chrome browser on your computer.
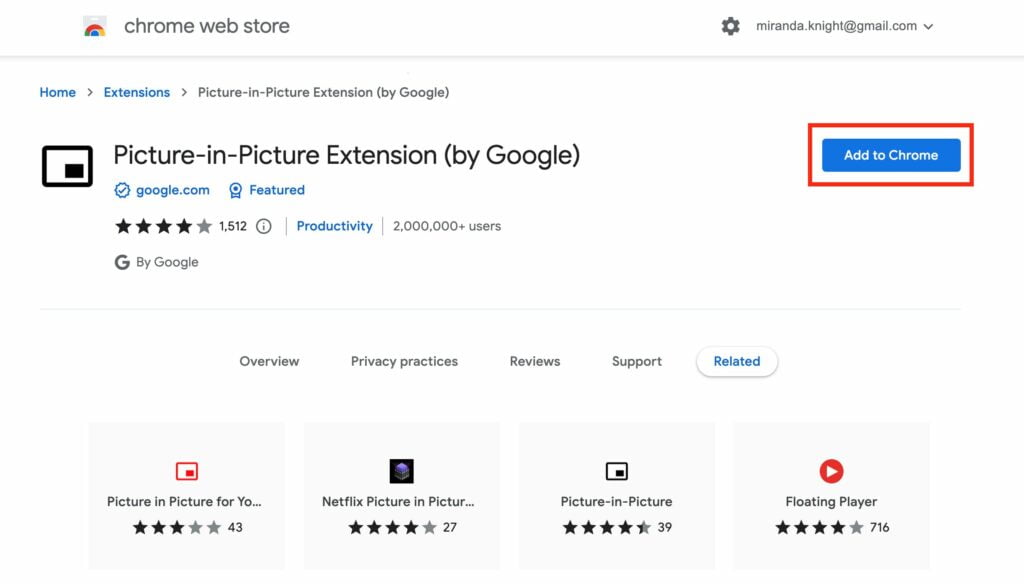
2. Head to the Chrome web store to find Picture-in-Picture Extension and click Add to Chrome button.
3. Then, go to YouTube and play a video.
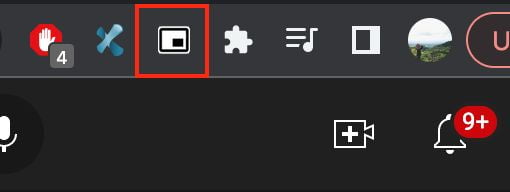
4. While the video is playing, click the extension.
5. See that on your current tab there is a Playing picture-in-picture message, and when you open another app the currently played video is still playing.
Hide Your WhatsApp Online Status
WhatsApp Web, unlike its Android counterpart, does not allow you to hide your online status. There is a Chrome extension that can help you appear offline for WhatsApp Web.
1. Navigate to the Chrome Web Store and install WAIncognito.
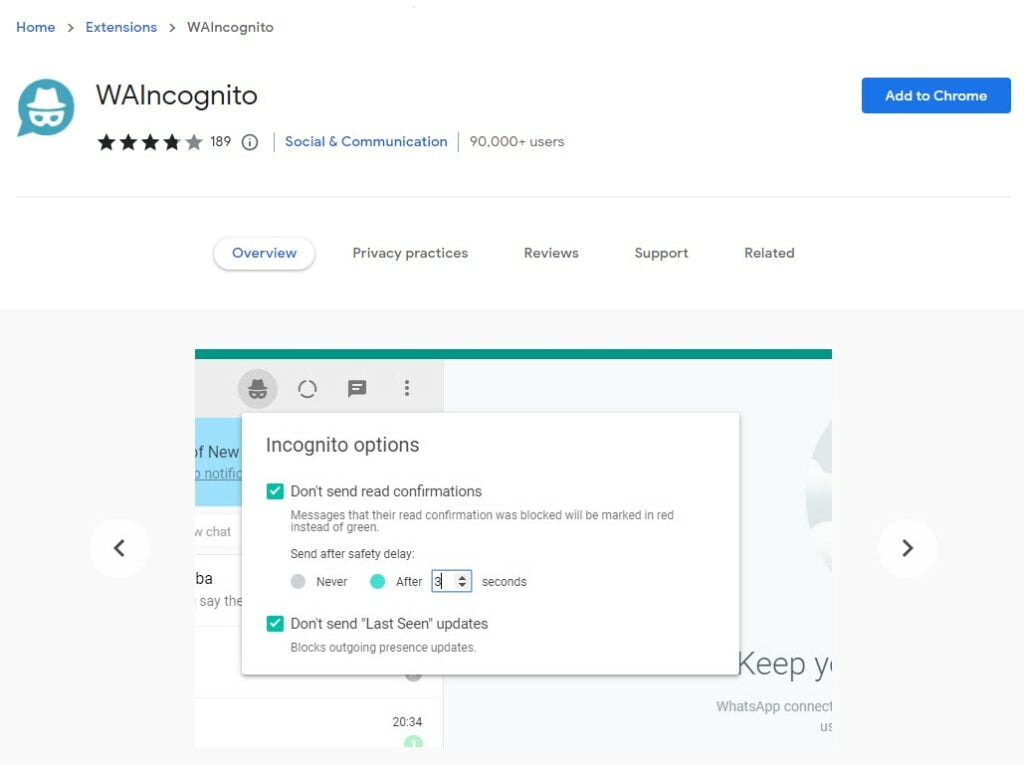
3. When you open web.whatsapp.com, you’ll notice an incognito option right next to the WhatsApp Status.
4. You can easily block it by selecting ‘Don’t Send Last Seen Updates‘ from the menu. This extension can also be used to block read receipts.
There are numerous advantages to concealing your online identity. You will not feel obligated to respond to a message as soon as you read it.
Scan Your Saved Passwords and Replace Compromised Password on Android
Google Chrome on Android has a security feature called Check passwords. By running this feature you will know how many credential accounts you have that are compromised. After you know the compromised passwords, you can simply change the password.
1. First, launch Google Chrome on your Android smartphone.
2. Then, tap the three-dot button on the top-right corner of the screen.
3. Select the settings option.
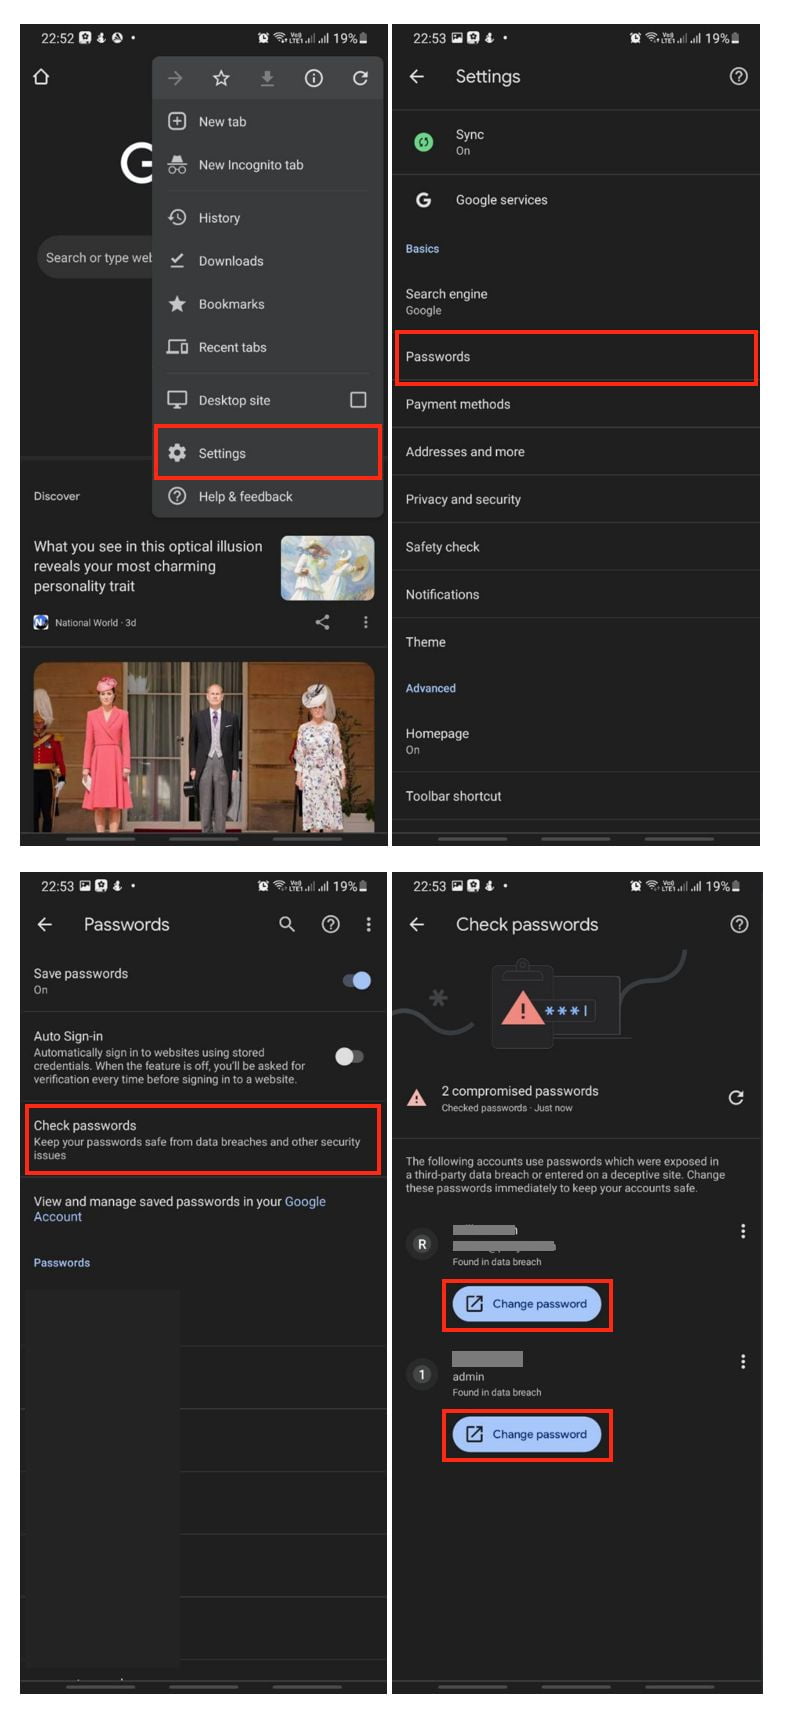
4. After that, scroll a bit and tap the passwords option.
5. Next, tap the Check password menu.
6. Wait a moment while Chrome is scanning the compromised passwords.
7. After you see the result, tap the Change button to secure the account.
Disable and Remove Browser Extension
By installing a browser extension, the Chrome browser will have more features if compared to the basic Chrome browser. However, sometimes you need to disable or even remove the chrome extension for some reason.
Disable Extension
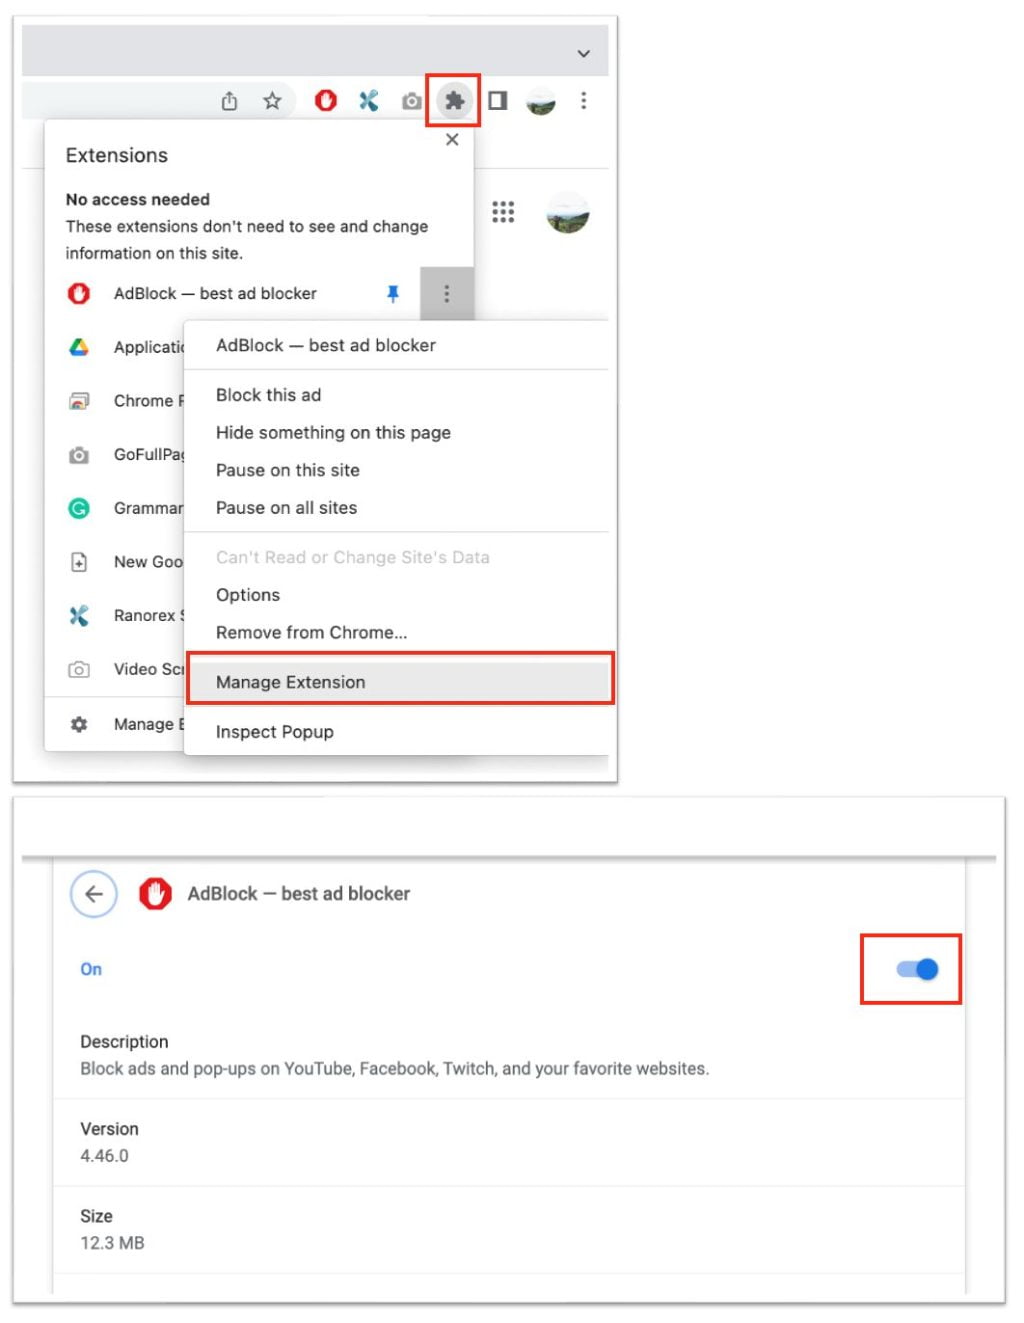
- First, launch the chrome browser on your computer.
2. Then, click the puzzle icon button on the top right corner.
3. After that, click the more button in front of the extension that you want to disable.
4. Click the manage extension.
5. Now, switch off the toggle to disable the extension.
Remove Extension
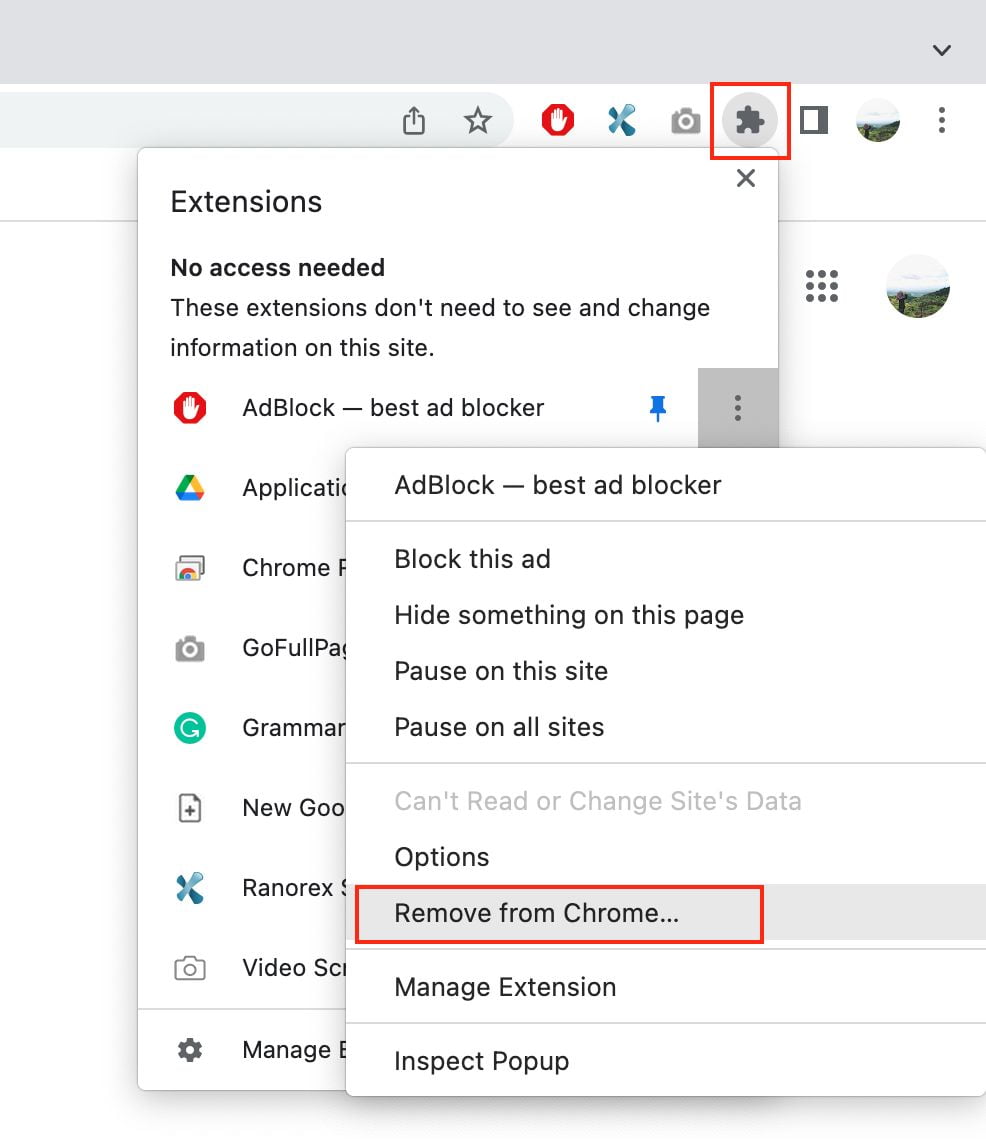
1. First, launch the Chrome browser on your computer.
2. On the top right corner, click a piece of a puzzle icon button.
3. Then, click the three dots button in front of an installed extension.
4. After that, click Remove from Chrome.
5. Wait a moment until the removing process is done.
Recover Deleted History
The history files remind users of where they have been on the internet and allow them to return to any pages that have been accidentally closed.
The annoyance is that the Google Chrome history may be lost for unknown reasons, the most common of which is deletion.
Check Your Google Activity for Deleted History
1. Navigate to your “Google account” in any browser.
2. In the vertical sidebar, select “Data & Privacy”.

3. Click “Web & App Activity” in the “Things you’ve done and places you’ve been” tab.

4. Now, select “Manage all Web and App Activity”.

The outcomes are comparable to your browsing history. You can also see what keywords you’ve previously searched for.
Use Windows’ Restore Previous Versions’ Option to Recover History
1. Go to “Local Disk (C:)”, the usual default location for app installations, in “Windows Explorer”.

2. Now, navigate to the “Users” folder.
3. Next, navigate to “[Username]” (the name of your user profile).
4. Select the “View” tab, then check the “Hidden Items” checkbox.
5. Navigate to the “AppData” folder.
6. Navigate to “Local” now.

7. Right-click on the “Google” folder and select Properties.
8. Select “Properties” from the pop-up menu.
8. In the dialog box, select the “Previous versions” tab.

9. Choose the previous version you want to restore and press the “Apply” button.
10. Finally, press the “OK” button.
You have now returned your browsing history to its previous state.
Block or Enable Cookies Permission Only for a Website
You probably see the cookie acceptance dialog box all the time, right? Well, you can reject or accept any and all cookies with one click.
Open Google Chrome and navigate to Settings -> Privacy and Security -> Cookies and other site data.
First, we’ll see the General Settings, where you can choose to allow all cookies, block third-party cookies, block all, and so on.

You must proceed to the section below for this. There will be a button to add websites that can always use cookies and websites that cannot use cookies at all.

As you can see, you essentially create a white or black list. Sites that you enable so that they can register all necessary cookies, and another list of sites that you never want to register our data when you browse their page.
Simply click “Add”, and a bar will appear for you to enter the exact URL of that page. Furthermore, you will see a checkbox to include third-party cookies on that specific site. You can check or uncheck the box depending on whether you want to include third-party cookies.

Once this is completed, including the URL and whether or not the box is checked, all that remains is to click Add. That website will be automatically added to the list that you have created to block or allow all cookies, without affecting the rest of the web pages that you can browse at any time.
Delete Cookies From Individual Sites
In order to fix a website or protect your privacy online, you may need to completely delete all cookies in Chrome. However, this can be a headache! You’ll have to log back into previously used sites, such as Google Docs. Sometimes you wish you could delete specific cookies from a website.
1. Launch Google Chrome.
2. Navigate to Settings -> Privacy and Security -> Site Settings -> Cookies and site data > See all cookies and site data.

3. Locate the cookie you want to remove and click the “Trashcan” icon to the right of it.

I hope these tips helpful for you. Enjoy!


