Sometimes we feel that our MacBook screen is too narrow to do some tasks. Then, we try to set the font size our screen view to be smaller, so that we can get the wider area shows on our MacBook screen. But time after time, our eyes are easy to get tired. Okay, there is an idea. Why don’t you install an external monitor for your MacBook?
By installing an external monitor, it really helps to increase the viewing area. Not only helping us in doing presentations but also helping us to multitask. Here are the steps of How to Connect Your MacBook or MacBook Air to an External Monitor.
Quick-Step
Find Apple adapter cable > Connect to monitor > Open Display setting > Click Apple icon on the toolbar > System Preferences > Arrangement tab > Tick/untick Mirror Displays > Move displays into the arrangement you need
Connecting MacBook to Your External Monitor
1. Find out the type of Apple adapter and cable to connect your MacBook and the external monitor.
2. Connect your MacBook and the monitor with those adapters and cable.
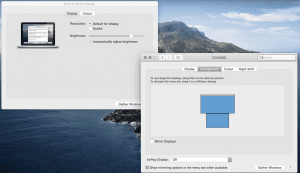
3. Open Displays setting. Click Apple icon on the toolbar and choose System Preferences.
4. Now click the Arrangement tab.

5. If you use the external monitor to do a presentation, tick the Mirror Displays tick box. Ticking this tick box means you set the external monitor to show the same content as your MacBook shows.
6. If you use the external monitor for doing different task with your MacBook, please untick the Mirror Display tick box.
7. Move the illustration displays into the arrangement you need. The main screen will show the white menu bar. Move this menu bar to the screen you want to be dominant.
That’s all. Hope this tutorial is helpful for you. Don’t forget to visit Nimblehand.com daily as we always have a new fascinating article for you.
See you and have a nice day. :))


