Are you feeling hesitant to start using Mac because you are currently a Windows user that doesn’t like to migrate all your data manually?
If so, don’t worry. I will show you How to Move Your Data from your Windows PC to a Mac.
Quick-Step
For both Windows and Mac, download and install Migration Assistant > Launch it > Continue > Utilities > Migration Assistant > Follow the prompt > Enter administrator username and password > Select PC > Input passcode >
Select the information to migrate > Next
Moving Data from Windows PC to Mac
There are some things that you must prepare before you start to move your data from Windows to Mac.
– As Migration Assistant can only be used in minimum Windows 7, please make sure that your Windows is already updated.
– Make sure that you have your administrator username and password on your PC.
– Now, connect the Mac and your PC to the same network or you can connect it with an Ethernet cable between the Mac and PC ports to create a direct connection. Some types of Mac require USB-C to Gigabit Ethernet Belkin Adaptor or Thunderbolt to Apple Gigabit Ethernet Adaptor.
– Please follow Microsoft’s Instructions for uninstalling OneDrive before you start to continue if you use Microsoft OneDrive on your PC. Don’t worry, you can reinstall it after your data migration has been completed.
Then, please make sure if there is no problem with your hard drive Windows using the check disk (chkdsk) utility. Here are how to use the utility:
1. Point your cursor to Start button, right-click it, then click Run.
2. Type cmd, then press Enter. You will see that the Comand Prompt is open.
3. At the prompt, type chkdsk and press Enter.
4. If there is any issue or problem that is reported by the utility, you can type this kind of command:
5. The drive is the alphabet that represent the startup disk of your Windows, for example, is D:

6. Press Enter button on your keyboard.
7. Now, type Y, at the prompt, then restart your PC.
8. You must repeat this process until no issue is reported by check dist utility. You probably have to bring your PC to a service center first if the utility can’t fix every problem or issue that it finds. Then you can move all your data from your PC to a Mac.
After you finished the preparation, it’s time to move or migrate your data from your PC to your Mac. Here are the steps about How to Move Your Data from your Windows PC to a Mac:
1. Download Windows Migration Assistant on your PC. Make sure you install it based on the macOS version of your Mac.
2. Then, close any apps you opened.
3. Find Windows Migration Assistant that you installed previously, then click Continue.
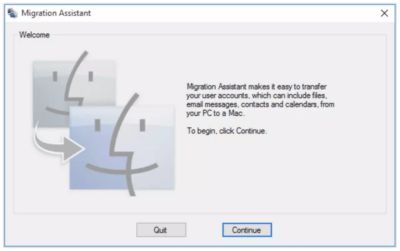
4. Now, start up your Mac. Search the Utilities folder in your Applications folder. Find Migration Assistant in Utilities.
5. Follow the on-screen prompt on your Mac until it brings you to the migration pane of the assistant. You will see three options there. Please select option two, which is “From a Windows PC”. It means you will transfer your information or your data from your PC. After selecting it, click Continue.
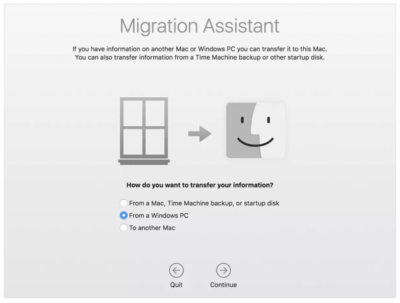
6. Enter the administrator username and password when it’s required.
7. Click continue to close any other opened apps.
8. Select your PC from the list of available computers in the migration Windows on your Mac. Wait a moment until your PC and Mac show the same passcode.
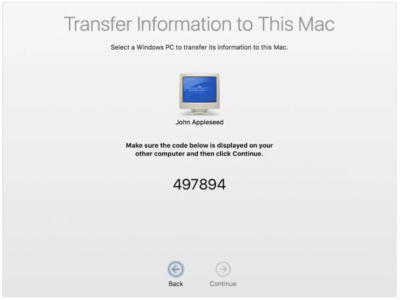
9. Then click Continue on your PC and Mac after both screens display the same passcode.
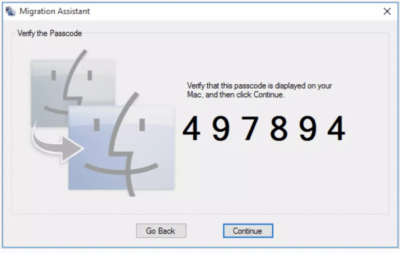
10. The Mac will scan the drive on your PC to arrange the list of information that will be migrated. When the scanning process has finished, select the information that will be migrated, then click Continue.
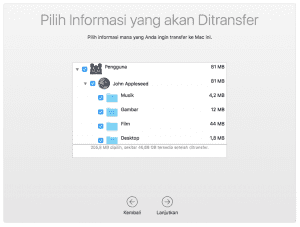
11. Close Windows Migration Assistant after the migration process has been completed. Then, log in to your Mac using a new user account. You will be asked to set a password when it’s the first time you log in to a user account migrated from your PC. You can actually create a new password or reuse the old password you used on your PC.
That’s all. Hope you find it useful and don’t forget to always visit Nimblehand so you will not miss every new interesting tutorial article that is released every day. Last, see you and have a nice day :))


