Dark mode has become a trend recently. It is a display setting for user interfaces, such as a smartphone or laptop. It means that, instead of the default dark text showing up against a light screen (known as ‘light mode’), a light color text (white or grey) is presented against a dark or black screen.
Dark mode can also be known as:
– black mode
– dark theme
– night mode
– light-on-dark
If you are the kind of person who spends a lot of time using your MacBook, I strongly suggest you activate the dark mode feature. Why? First, it reduces exposure to blue light. Second, it reduces the strain on your eyes. Third, it reduces the battery usage of your MacBook.
Now, the question is How to Activate The Dark Mode Feature on Your MacBook? Starting from MacOS Mojave, you can now activate the dark mode. Unlike the previous MacOS, the dark mode is only working on the menu bar, dock, and certain sections.
Well, here are the steps of How to Activate The dark Mode Feature on Your MacBook.
Quick-Step
Click Apple button > System Preferences > General > Appearance > Dark
Activating the Dark Mode on Your MacBook
1. First of all, please ensure your MacOS is Mojave or higher.
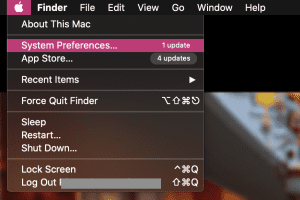
2. Find Apple icon on the left top corner of your MacBook screen.

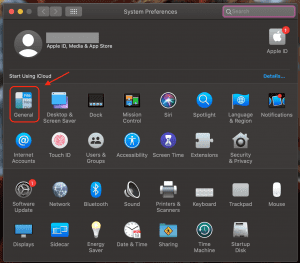
3. Click the Apple icon, choose System Preferences.

4. Then, click the General menu.

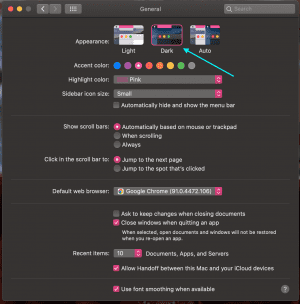
5. There you are. On the Appearance choice, choose the second one, the Dark. Now, your MacBook is in dark mode.
Besides, you can customize some colors of the Accent color, and Highlight color. Even though all MacBooks with MacOS Mojave systems already support dark mode, not all third-party applications or software support dark mode. The app developer team must update their app in order to support this feature.
That’s it. Hope this article is useful for you. Thank you for visiting Nimblehand.com and see you. :))


